Upload of Melody and Pitches.h Fail to Upload to Arduino Uno Board
Arduino is an splendid fashion to simplify and speed up your microcontroller projects, cheers to its community of developers who have made almost everything look uncomplicated. There are lots of Arduino Projects out hither for you to effort and have fun. Some of your projects might need some sounds action to notify near something or just to impress the viewers. What if I told you that almost whatsoever theme songs that could be played on a piano can exist mimicked on your Arduino with the help of a simple plan and a cheap Piezo speaker?
In this tutorial we will learn how simple and piece of cake it is to Play Melody on Piezo Cablegram or Speaker using the Arduino tone () part. At the cease of this tutorial you will exist able to play some famous tones of Pirates of Caribbean area, Crazy Frog, Super Mario and Titanic. You volition also learn how to play whatsoever piece of piano music with Arduino. Check the Video at the stop.
Hardware Required:
- Arduino (any version – UNO is used here)
- Piezo Speaker/Buzzer or whatsoever other 8ohm speaker.
- Breadboard
- Connecting Wires
- Push button buttons
- 1k resistor (optional)
Understanding the Tone() function of Arduino:
Before we can understand how a tone () works nosotros should know how a Piezo buzzer works. We might have learnt almost Piezo crystals in our school, it is nothing just a crystal which converts mechanical vibrations into electricity or vice versa. Here we apply a variable current (frequency) for which the crystal vibrates thus producing sound. Hence in lodge to make the Piezo cablegram to make some noise we have to make the Piezo electrical crystal to vibrate, the pitch and tone of dissonance depends on how fast the crystal vibrates. Hence the tone and pitch tin can be controlled by varying the frequency of the current.
Okay, so how practise nosotros get a variable frequency from Arduino? This is where the tone () role comes in. The tone () can generate a particular frequency on a specific pivot. The time elapsing can also be mentioned if required. The syntax for tone () is
Syntax tone(pin, frequency) tone(pin, frequency, elapsing) Parameters pivot: the pin on which to generate the tone frequency: the frequency of the tone in hertz - unsigned int duration: the duration of the tone in milliseconds (optional) - unsigned long
The values of pin can be any of your digital pin. I accept used pivot number 8 here. The frequency that can be generated depends on the size of the timer in your Arduino board. For UNO and virtually other common boards the minimum frequency that can be produced is 31Hz and the maximum frequency that tin can be produced is 65535Hz. All the same we humans can hear but frequencies between 2000Hz and 5000 Hz.
The pitches.h header file:
Now, we know how to produce some noise using the arduinotone() function . Merely, how do we know what kind of tone will exist generated for each frequency?
Arduino have given us a note table which equates each frequency to a specific musical annotation type. This annotation table was originally written by Brett Hagman, on whose work the tone() control was based. We will utilise this note table to play our themes. If you are someone familiar with sheet music yous should be able to brand some sense of this table, for others like me these are just another cake of code.
#define NOTE_B0 31 #define NOTE_C1 33 #ascertain NOTE_CS1 35 #define NOTE_D1 37 #ascertain NOTE_DS1 39 #define NOTE_E1 41 #define NOTE_F1 44 #define NOTE_FS1 46 #define NOTE_G1 49 #define NOTE_GS1 52 #define NOTE_A1 55 #define NOTE_AS1 58 #define NOTE_B1 62 #ascertain NOTE_C2 65 #define NOTE_CS2 69 #define NOTE_D2 73 #ascertain NOTE_DS2 78 #ascertain NOTE_E2 82 #ascertain NOTE_F2 87 #define NOTE_FS2 93 #ascertain NOTE_G2 98 #define NOTE_GS2 104 #define NOTE_A2 110 #define NOTE_AS2 117 #define NOTE_B2 123 #define NOTE_C3 131 #define NOTE_CS3 139 #define NOTE_D3 147 #ascertain NOTE_DS3 156 #ascertain NOTE_E3 165 #define NOTE_F3 175 #define NOTE_FS3 185 #define NOTE_G3 196 #define NOTE_GS3 208 #define NOTE_A3 220 #define NOTE_AS3 233 #ascertain NOTE_B3 247 #define NOTE_C4 262 #define NOTE_CS4 277 #define NOTE_D4 294 #define NOTE_DS4 311 #define NOTE_E4 330 #define NOTE_F4 349 #define NOTE_FS4 370 #define NOTE_G4 392 #define NOTE_GS4 415 #define NOTE_A4 440 #define NOTE_AS4 466 #define NOTE_B4 494 #define NOTE_C5 523 #define NOTE_CS5 554 #define NOTE_D5 587 #define NOTE_DS5 622 #define NOTE_E5 659 #define NOTE_F5 698 #define NOTE_FS5 740 #define NOTE_G5 784 #define NOTE_GS5 831 #define NOTE_A5 880 #ascertain NOTE_AS5 932 #define NOTE_B5 988 #define NOTE_C6 1047 #define NOTE_CS6 1109 #define NOTE_D6 1175 #define NOTE_DS6 1245 #define NOTE_E6 1319 #define NOTE_F6 1397 #define NOTE_FS6 1480 #define NOTE_G6 1568 #define NOTE_GS6 1661 #define NOTE_A6 1760 #define NOTE_AS6 1865 #ascertain NOTE_B6 1976 #define NOTE_C7 2093 #define NOTE_CS7 2217 #define NOTE_D7 2349 #define NOTE_DS7 2489 #define NOTE_E7 2637 #ascertain NOTE_F7 2794 #define NOTE_FS7 2960 #define NOTE_G7 3136 #define NOTE_GS7 3322 #define NOTE_A7 3520 #define NOTE_AS7 3729 #define NOTE_B7 3951 #define NOTE_C8 4186 #define NOTE_CS8 4435 #ascertain NOTE_D8 4699 #define NOTE_DS8 4978
Above code is given in pitches.h header file in this zip file, you but need to download and include this file in our Arduino code as given at the end this tutorial or use the lawmaking given in the zip file.
Playing Musical Notes on Arduino:
To play a decent tune using Arduino we should know what constitutes these melodies. The three primary factors required to play a theme are
- Annotation value
- Note Duration
- Tempo
Nosotros accept the pitches.h header file to play whatever note value, at present we should discover out its specific notation duration to play information technology. Tempo is nix only how fast the melody should be played. In one case you know the Note value and Note elapsing you can utilize them with the tone() similar
tone (pinName, Annotation Value, Annotation Duration);
For the tones played in this tutorial I have given you the note Value and Note duration inside the "themes.h" header file using which yous tin can play them in your projects. But if y'all have any specific tone in your mine and you lot want to play it in your projection read on.... Else skip this topic and fall downward to the next.
To play any specific tone you take to get the sheet music of that detail music and convert sheet music to Arduino sketch by reading the note value and notation elapsing from information technology. If you lot are a musical student it would be a piece of block for you, else spent some fourth dimension and break you head like I did. But at the cease of the day when your tone plays on the Piezo cablegram you volition find your endeavour worth it.
Once you have the note value and annotation duration, load them into the programme within the "themes.h" header file every bit shown below
//##############**"HE IS A PIRATE" Theme vocal of Pirates of caribbean**##############// int Pirates_note[] = { NOTE_D4, NOTE_D4, NOTE_D4, NOTE_D4, NOTE_D4, NOTE_D4, NOTE_D4, NOTE_D4, NOTE_D4, NOTE_D4, NOTE_D4, NOTE_D4, NOTE_D4, NOTE_D4, NOTE_D4, NOTE_D4, NOTE_D4, NOTE_D4, NOTE_D4, NOTE_D4, NOTE_D4, NOTE_D4, NOTE_D4, NOTE_D4, NOTE_A3, NOTE_C4, NOTE_D4, NOTE_D4, NOTE_D4, NOTE_E4, NOTE_F4, NOTE_F4, NOTE_F4, NOTE_G4, NOTE_E4, NOTE_E4, NOTE_D4, NOTE_C4, NOTE_C4, NOTE_D4, 0, NOTE_A3, NOTE_C4, NOTE_B3, NOTE_D4, NOTE_B3, NOTE_E4, NOTE_F4, NOTE_F4, NOTE_C4, NOTE_C4, NOTE_C4, NOTE_C4, NOTE_D4, NOTE_C4, NOTE_D4, 0, 0, NOTE_A3, NOTE_C4, NOTE_D4, NOTE_D4, NOTE_D4, NOTE_F4, NOTE_G4, NOTE_G4, NOTE_G4, NOTE_A4, NOTE_A4, NOTE_A4, NOTE_A4, NOTE_G4, NOTE_A4, NOTE_D4, 0, NOTE_D4, NOTE_E3, NOTE_F4, NOTE_F4, NOTE_G4, NOTE_A4, NOTE_D4, 0, NOTE_D4, NOTE_F4, NOTE_E4, NOTE_E4, NOTE_F4, NOTE_D4 }; int Pirates_duration[] = { 4,8,4,8,4,viii,eight,8,8,4,eight,4,8,4,8,8,8,eight,4,8,iv,eight, 4,viii,eight,8,eight,iv,4,8,8,4,iv,8,viii,4,4,8,8, eight,four,8,8,8,4,four,8,eight,4,4,viii,8,4,four,eight,four, four,8,8,viii,8,four,4,viii,viii,iv,four,8,8,4,four,viii,8, 8,four,8,viii,viii,iv,4,4,8,4,8,8,8,4,4,8,eight }; //###########Terminate of He is a Pirate song#############// The above block of code shows the note value and annotation duration of "He is a Pirate" theme grade the picture show Pirates of the Caribbean. You lot can add your theme similarly like this.
Schematic and Hardware:
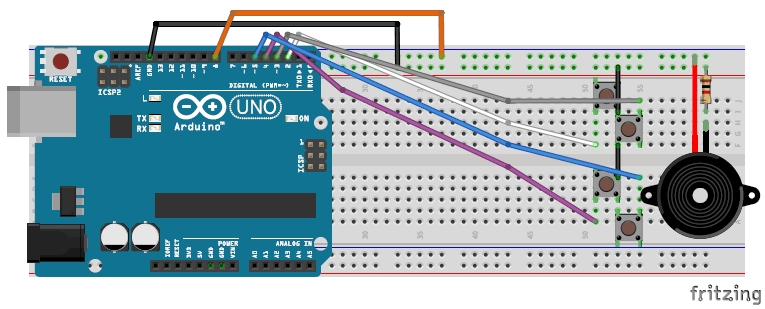
The schematic of thisArduino Tone Generator Project projection is shown in the figure below:

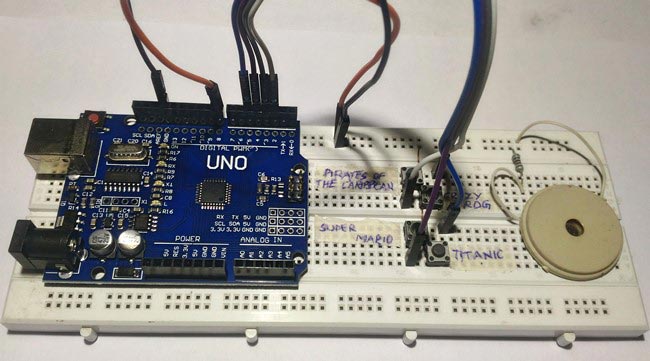
The connection is pretty simple we have a Piezo speaker which is connected to pivot 8 and Ground of the Arduino through a 1K resistor. This 1k resistor is a electric current limiting resistor, which is used to keep the current within the condom limits. We also have iv switches to select the required melody. I end of the switch is connected to footing and the other end is continued to pivot 2, 3, 4 and v respectively. The switches will have pull up resistors enabled internally using the software. Since the circuit is pretty simple it can be connect using a bread board as shown below:
Arduino Program Explanation:
Once yous have understood the concept, the Arduino program is pretty straight frontward. The complete code is given at the stop of the tutorial. If you are non familiar with adding header files y'all can download the lawmaking equally a Null file from hither and directly upload it to your Arduino.
The higher up two are the header files that have to be added. "pitches.h" is used to equate each musical note to a particular frequency and "themes.h" contains the annotation value and annotation duration of all the four tones.
#include "pitches.h" #include "themes.h"
A function is created to play each tone when required. Hither when the office Play_Pirates() is called the "He is a Pirate" tone will be played. This function consists of the tone office which produces the frequency at pin number 8. The noTone(8) is called to stop the music once information technology'south played. If you lot desire to play your own tone, change the Pirates_note and Pirates_duration to the new note and duration values that you have saved in "themes.h" value
void Play_Pirates() { for (int thisNote = 0; thisNote < (sizeof(Pirates_note)/sizeof(int)); thisNote++) { int noteDuration = thousand / Pirates_duration[thisNote];//catechumen elapsing to time delay tone(viii, Pirates_note[thisNote], noteDuration); int pauseBetweenNotes = noteDuration * 1.05; //Here 1.05 is tempo, increase to play it slower filibuster(pauseBetweenNotes); noTone(8); } } The pivot 2, 3, four and 5 are used to select the particular tone to exist played. These pins are held high by default using the internal pull up resistors by using the to a higher place line of code. When the push is pressed it is pulled down to ground.
pinMode(ii, INPUT_PULLUP); pinMode(iii, INPUT_PULLUP); pinMode(4, INPUT_PULLUP); pinMode(5, INPUT_PULLUP);
Beneath block of code is used to play the song when a button is pressed. It reads the digital value of each button and when it gets low (zero) it assumes that the button is pressed and plays the respective tone past calling the required function.
if (digitalRead(ii)==0) { Serial.println("Selected -> 'He is a Pirate' "); Play_Pirates(); } if (digitalRead(3)==0) { Series.println("Selected -> 'Crazy Frog' "); Play_CrazyFrog(); } if (digitalRead(4)==0) { Serial.println("Selected -> 'Mario UnderWorld' "); Play_MarioUW(); } if (digitalRead(5)==0) { Serial.println("Selected -> 'He is a Pirate' "); Play_Pirates(); } Working of this Melody Player Arduino Circuit:
In one case your Code and Hardware is prepare, merely burn the program into your Arduino and yous should be able to play the tone past just pressing the buttons. If you have any problems take a look at your serial monitor for debugging or employ the comment section to study the problem and I will be happy to help yous out.
The complete working of the project is shown in the video beneath. Hope yous enjoyed the project and would utilise information technology in some of your project or create a new tone for your project. If yes experience free to share your work in the comment section.
Code
#include "pitches.h" //add Equivalent frequency for musical annotation
#include "themes.h" //add Note vale and elapsing
void Play_Pirates()
{
for (int thisNote = 0; thisNote < (sizeof(Pirates_note)/sizeof(int)); thisNote++) {
int noteDuration = 1000 / Pirates_duration[thisNote];//catechumen duration to time filibuster
tone(8, Pirates_note[thisNote], noteDuration);
int pauseBetweenNotes = noteDuration * one.05; //Hither 1.05 is tempo, increase to play it slower
filibuster(pauseBetweenNotes);
noTone(8); //cease music on pin 8
}
}
void Play_CrazyFrog()
{
for (int thisNote = 0; thisNote < (sizeof(CrazyFrog_note)/sizeof(int)); thisNote++) {
int noteDuration = thou / CrazyFrog_duration[thisNote]; //convert duration to time filibuster
tone(8, CrazyFrog_note[thisNote], noteDuration);
int pauseBetweenNotes = noteDuration * 1.30;//Here ane.30 is tempo, decrease to play it faster
delay(pauseBetweenNotes);
noTone(eight); //terminate music on pivot eight
}
}
void Play_MarioUW()
{
for (int thisNote = 0; thisNote < (sizeof(MarioUW_note)/sizeof(int)); thisNote++) {
int noteDuration = grand / MarioUW_duration[thisNote];//convert duration to fourth dimension delay
tone(8, MarioUW_note[thisNote], noteDuration);
int pauseBetweenNotes = noteDuration * 1.80;
delay(pauseBetweenNotes);
noTone(viii); //stop music on pin 8
}
}
void Play_Titanic()
{
for (int thisNote = 0; thisNote < (sizeof(Titanic_note)/sizeof(int)); thisNote++) {
int noteDuration = 1000 / Titanic_duration[thisNote];//catechumen duration to time filibuster
tone(8, Titanic_note[thisNote], noteDuration);
int pauseBetweenNotes = noteDuration * 2.70;
filibuster(pauseBetweenNotes);
noTone(8); //stop music on pin 8
}
}
void setup() {
pinMode(2, INPUT_PULLUP); //Button i with internal pull up
pinMode(three, INPUT_PULLUP); //Push 2 with internal pull up
pinMode(four, INPUT_PULLUP); //Button iii with internal pull upwardly
pinMode(v, INPUT_PULLUP); //Button 4 with internal pull up
Series.begin(9600);
}
void loop() {
if (digitalRead(two)==0)
{ Serial.println("Selected -> 'He is a Pirate' "); Play_Pirates(); }
if (digitalRead(3)==0)
{ Series.println("Selected -> 'Crazy Frog' "); Play_CrazyFrog(); }
if (digitalRead(4)==0)
{ Serial.println("Selected -> 'Mario UnderWorld' "); Play_MarioUW(); }
if (digitalRead(five)==0)
{ Series.println("Selected -> 'Titanic' "); Play_Titanic(); }
}
Source: https://circuitdigest.com/microcontroller-projects/playing-melodies-on-piezo-buzzer-using-arduino-tone-function
0 Response to "Upload of Melody and Pitches.h Fail to Upload to Arduino Uno Board"
Post a Comment